SourceForge.net Logo

CGRU

CGTALK.RU Logo

Local Tools Online Documentation

Features and usage:

Quick start:

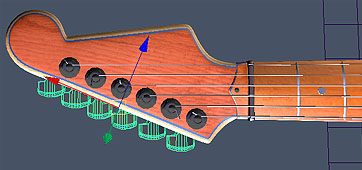
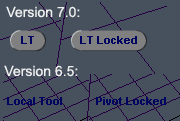
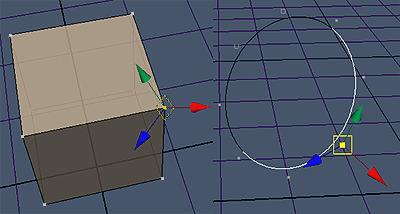
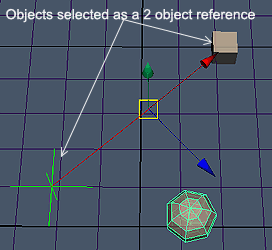
  To use the tool you first need to select something you would like to transform. These are objects (transform nodes), components (any type of components) or both together.

  With this done you next use the "Take reference" button in the UI, a hotkey/marking menu/shelf or menu item in the "Transformation tools" menu. It all depends on how you've customized the tool.

  With "Take reference" applied you are now asked to select the desired component/object for the reference. This can be poly/subd/nurbs component/s or any object/s (see reference types).

  After you will select the desired reference, the tool will change tool options you will be ready to work in the desired local space. You can move, rotate, scale, change pivot's position and snap. The transformation is applied to "LocalToolReference" object which gets selected each time, you can also set transformation attributes to it via the channelBox.

  The tools stays active till the first selection change, i.e. you've selected another component/object to work with. You can also end the tool by ctrl pressing the "Take reference" button on the UI or shift pressing the HUD button in maya 7. But you will rarely need to end the tool with that.

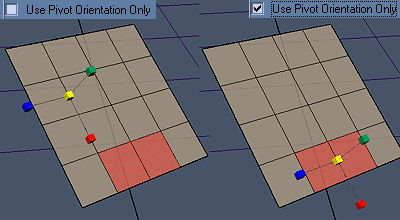
Features and option in detail:
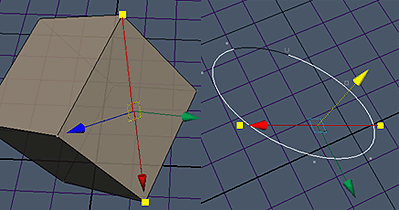
  • :

    This button activates the tool. It forces the tool to select a new reference. The new reference could be selected while the pivot is locked or while the tool is still active, to move the current selection along another reference or whatever. Ctrl clicking this button will end the current tool's session.

  • :

    Defines whether both orientation and position, or only orientation of a reference is applied to the pivot. When this is on, the pivot of the transformation (rotation, scale, and move) will be placed at the center of the selection. You can turn this on and off interactively at any moment. For example rotate a face around the reference, then around its center, etc. This also affects the way "Bake to Object" bakes reference's pivot to the object. See "Bake to Object" feature.


  • :

    This toggles the pivot lock. The pivot lock forces the tool to update itself on the selection change to transform the newly selected objects/comps. It's handy when you need to move many components in certain space, rotate around something, scale to align to something, etc. This also handles duplicate command, although without the smart transform thing. In that case it's recommended to bake axis to object. To turn this off you can use either a check box or a HUD button in maya version 7. Clicking the HUD button will toggle pivot lock.


  • :

    With this button you "bake" the current orientation to currently selected/hilited objects. Like if you were moving plane's vertex and a cube object, the tool would then bake the orientation to both the plane and a cube. The bake preserves object hierarchy, and geometry orientation. Like if your object was parented and was a parent of something, baking the pivot to it will only change its local orientation. Its “child” position will be preserved. Also if the object is transformed by its parents the orientation will still be the same as of the current reference. For clusters the tool as well retains geometry transformation. So again, only the local orientation is changed. For objects like empty groups, locators, lights and gizmos, the tool will rotate the object itself, but will still preserve all the hierarchy stuff. If the "Use orientation only" is turned off then the pivot position of the object is also moved to the position of the current reference. Else the tool will only change the orientation, leaving pivot position in its place.


  • :

    As described in the introduction, this setup was created to let you select your references faster. It tells what kind of selection mask the tool should set for the reference selection, depending on the type of your transformed selection. The setup consists of 2 columns: left for the selection type, right for the reference (pivot) you'd often want to use for it. Like if you often move the verts along edges, transform objects along faces, rotate faces in some object space, you'd setup the tool as follows: for vertex selection you'd set an edge pivot, for transform kind selection - face reference and for face selection - object reference.

  • HUD display:

    This will show up every time the tool is active, showing you the current state of the tool. In version 7 I've used a new HUD button mel command. The button click toggles pivot lock. Clicking the button with ctrl pressed will open up an option box for the tool. Shift clicking the button will end the current tool session.


  • You can add/remove components from your current transform list. Just select/deselect components (even on other objects) with maya ctrl/alt thing. It's useful when working with complex models. Like when you tweaked something really carefully and then noticed that you've grabbed something on the back of your model or didn't select some tiny vertex on the edge of the model. In those cases you can simply deselect/add components without having to tweak everything again.

  • All the options are saved as optionVars, thus they are kept between different sessions of maya.

Reference types:

  • Point reference:

    Uses the selected polygon/subdiv vertex, nurbs curve/surface CV, taking it's normal and position into the consideration.


  • Edge reference:

    Uses the selected polygon/subd edge taking its orientation, normal and position into the consideration. You can move/scale along the edge, rotate around it, etc.


  • Face reference:

    Uses the selected poly/subd face taking its position, normal and orientation into the consideration. You can move stuff in the plane of the face, scale to it to align to its plane, rotate around it etc.


  • 2 Point reference:

    Hold down shift, select the first point, then the second point (you can release the mouse in between the main thing is to select the second vertex with shift). Works on poly/subd verts and nurbs surfaces/curves CV's. It aligns the pivot to and imaginary edge that lies between the 2 points, taking normals, orientation and position into the consideration.


  • Object reference:

    Uses the world orientation of the supplied transform (object), and its pivot's position.


  • 2 Object reference:

    Similar to 2 Point pivot for vertexes. It aligns the pivot to lie on the line that connects the selected objects pivot points.

Tips:

  • You can move the local orientation from one object to another by selecting the source object as a reference, then baking the pivot to the target object.
  • You can flatten your geometry by selecting a pivot that best discribes the plane you wish to scale to, then scale the selection to 0 in the desired axis. This way you can align points to a perfect line, plane etc.
  • You can combine orientation with different pivot point positions, like you can take the orientation from the face, then snap the pivot center say to a vertex, etc.
  • While using the tool, if you've ended it up, you can always undo, the HUD will show up again, and you will be able to use previous pivot, lock it, etc.
  • I will be adding new tips in future, also feel free to mail me with some of yours, I will add them in :-)

Limitations:

 Due to the tool's slightly "faked" nature it has a couple of limitations:

  •   Because at time of transforming components with this tool both object and components get selected, maya's snap won't work correctly (retain spacing won't work). To fix that the component selection will disappear (only visually) while you will activate the snap (while holding v for instance). Don't worry the selection will come back when you will release the snap :-). This way you will be able to snap freely without messing up the comps to one point.

  •   Because of the fact that the technique I've used for polygons/nurbs won't work for subdivision surface, and there seems to be no other way to make it work, I had to hide the subdivision component selection while transforming it. So basically your subd component selection will visually disappear, but you can still transform it cause it's there. This prevents the double transformations that occur otherwise.


Copyrigt �2005, Henry Korol
Last updated: 04.09.05


SourceForge.net Project

CGRU

Раздел на форуме CGTALK.RU